


Flip-Flop Cards!!!
Just in time for Summer, a cute card idea!! These little dandies are so versatile (not to mention ADDICTING! I made SIX of them!!) They can be decorated generically to be used as notecards, or with theme-specific embellies to make a unique birthday invitation or thank you note. I decided to go with this style after a long debate on unique cards, but when I looked around on the Internet, I couldn't really find a template with a shape that suited my style well. I didn't want it to look like a "real" flip flop - long and narrow - but more the short, squat Japanese wedge-sandal type flip-flops. I set out to freehand a template that I could share with everyone else who is looking for a practical, card-sized flip-flop template out there! Here is the template, after scanning my black cut-outs, and then resizing them in white to provide a guideline for the inner template:

If you click the template, you will be able to see and print the full-sized document. Check in your browser's Print Preview setting to make sure that your template fills up the entire sheet of paper, then print as many copies as you think you will need! I have also included a link to the Envelope Template --> HERE <-- You can make this any size you want, including resizing the templates for the cards. The size for my examples was adjusted to be 9 1/2" wide. Courtesy of Mirkwood Designs. I reproduced it on true 8 1/2" x 11" so it prints at a size that fits the card, although it wasn't too far off to begin with. (Thanks to Ruthann Zaroff at Mirkwood Designs for the awesome template!!)
Once you've printed your templates, you can cut around the black part FIRST. This will be your cardstock base. I used a full sheet of cardstock for these projects, since the dimensions are slightly bigger than a half sheet, and the negative of the cutout you will make for this provides plenty of room to make a nice 5 1/2" x 6" (or smaller!) card. I folded the sheet of cardstock edge to edge, so I ended up with a folded 6" wide by 12" tall, and I used my bone folder to sturdy the crease. I laid the flip-flop template I wanted to use with the flattest side edge aligned with the crease, and overlapping just a TINY bit, then traced around and cut out (this ensured I would have enough of the crease along the edge for this to count as a card!) I also trimmed the excess from the side of the cardstock next to my cutout, leaving the bulk of the negative for the scrap pile, and I was left with two chunks of irregularly shaped cardstock. I cut 1/2" wide strips out of one of these, to make the straps for the flip-flops, and I reserved the rest for any matting or embellishing I might want to do on the face of the card later. When you're finished you should have a barenaked flip-flop shaped card!
From there, cut the white center out of the black template (this is why I included two - so you don't have to ruin one template to get the other!) Use the white template for the patterned paper that is the "background" canvas of your card. I tried to stick with something that had a subtle but still noticeable pattern - as so not to overpower any greetings or embellishments I might choose to put on the card. From here on out, it's all yours! Do it up however you'd like with flowers or other embellies and words (don't forget the words - or at least a monogram!) Also, a trick I did with the straps: when it came time to apply the straps, (which was right after I cut out the patterned paper, but before I adhered it to the cardstock) I laid them on the paper where I wanted them then I used my Exacto knife to cut slits right above the top and bottom edges of the slits, on the patterned paper. Then I folded each strip end over about 1/4" and put these "tabs" into the "slots" I'd made in the patterned, and stuck them to the back with photo corners. That gave the straps the little curvy raised arch that real flip flops have, and added a little extra dimension to the cards. THEN I glued the paper onto the card.
Have fun making these, and please make sure you link back to this blog if you decide to use my template! I would also love to see what you do with it, so if you make one, be sure to link it back here in the comments so we can all appreciate it! Thanks for checking out this tutorial and template! If you want to save the template to your hard drive rather than print it, just right click it and select "Save As..." or "Save Image As..." on the menu. Enjoy!!
MORE EXAMPLES:
 |  |  |
 |  |  |
Click to see a larger image!!
SUPPLIES:
-------------
"You Rock!!" Card
* Cardstock - Paperbilities
* Patterned Paper - Creative Imaginations "Caution Girl"
* Flowers - Darice; Simply Clean Digi Scraps
* "Sweetie" Button - Target $1 Aisle
* Fiskars Small Heart Punch
* Zots Large Dots
* Karen Foster Scraparatus (for hole punching)
* "DYMO" font from DaFont.com (for Label)
"What's Up?!" Card
* Cardstock - Paperbilities
* Patterned Paper - Creative Imaginations "Caution Girl"
* Flowers - Darice; Simply Clean Digi Scraps
* "Hottie" Button - Target $1 Aisle
* Bling - Wal-Mart Craft Aisle
* Zots Large & Small Dots
* Karen Foster Scraparatus (for hole punching)
* "DYMO" font from DaFont.com (for Label)
"Delight" Card
* Cardstock - Paperbilities
* Patterned Paper - Reminisce
* "Delight" Metal Word & Silver Brad - Making Memories
* Coconut Drink - Dress-it-Up Buttons
* Sun Charm - American Traditional Designs
* Starfish & Beach Scene stickers - Miss Elizabeth's
* Cowrie Shells - Wal-Mart Craft Aisle
* Flowers - Darice; Simply Clean Digi Scraps
* Zots Large Dots
* Karen Foster Scraparatus (for hole punching)
"Thanks" Card
*** MADE FOR WHAT'S SCRAPPENING? JUNE '07 GUEST DT ***
* Cardstock - Bazzill
* Patterned Paper - Heidi Grace; Miss Elizabeth's; ProvoCraft
* Flowers - Darice; Simply Clean Digi Scraps
* Brad - Eyelet Outlet
* Font - DYMO
"School's Out" Card
*** MADE FOR WHAT'S SCRAPPENING? JUNE '07 GUEST DT ***
* Cardstock - Bazzill
* Patterned Paper - Heidi Grace; Daisy D's; ProvoCraft
* Flowers - Archiver's; Simply Clean Digi Scraps
* Font - DYMO
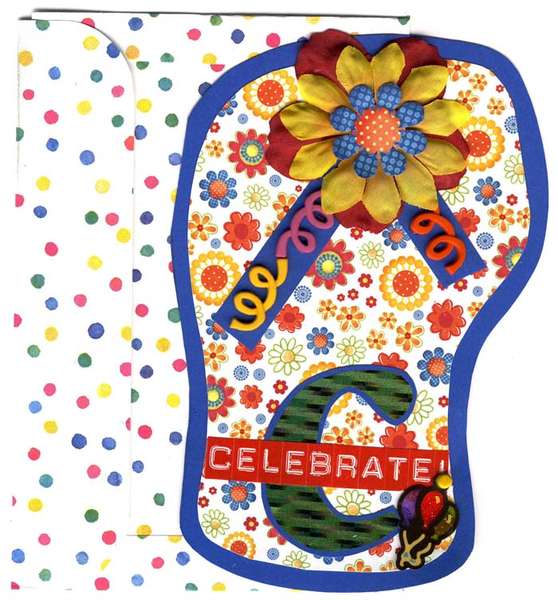
"Celebrate" Card
* Cardstock - Paperbilities
* Patterned Paper - Imaginisce "Let's Pretend"
* Green Holo Vellum - Miss Elizabeth's
* Flowers - Darice; Imaginisce
* Confetti Streamer Embellies - Dress-it-Up Buttons
* Balloons Charm - American Traditional Designs
* Brad - Making Memories
* Zots Large & Small Dots
* Karen Foster Scraparatus (for hole punching)
* "DYMO" font from DaFont.com (for Label)
-------------
"You Rock!!" Card
* Cardstock - Paperbilities
* Patterned Paper - Creative Imaginations "Caution Girl"
* Flowers - Darice; Simply Clean Digi Scraps
* "Sweetie" Button - Target $1 Aisle
* Fiskars Small Heart Punch
* Zots Large Dots
* Karen Foster Scraparatus (for hole punching)
* "DYMO" font from DaFont.com (for Label)
"What's Up?!" Card
* Cardstock - Paperbilities
* Patterned Paper - Creative Imaginations "Caution Girl"
* Flowers - Darice; Simply Clean Digi Scraps
* "Hottie" Button - Target $1 Aisle
* Bling - Wal-Mart Craft Aisle
* Zots Large & Small Dots
* Karen Foster Scraparatus (for hole punching)
* "DYMO" font from DaFont.com (for Label)
"Delight" Card
* Cardstock - Paperbilities
* Patterned Paper - Reminisce
* "Delight" Metal Word & Silver Brad - Making Memories
* Coconut Drink - Dress-it-Up Buttons
* Sun Charm - American Traditional Designs
* Starfish & Beach Scene stickers - Miss Elizabeth's
* Cowrie Shells - Wal-Mart Craft Aisle
* Flowers - Darice; Simply Clean Digi Scraps
* Zots Large Dots
* Karen Foster Scraparatus (for hole punching)
"Thanks" Card
*** MADE FOR WHAT'S SCRAPPENING? JUNE '07 GUEST DT ***
* Cardstock - Bazzill
* Patterned Paper - Heidi Grace; Miss Elizabeth's; ProvoCraft
* Flowers - Darice; Simply Clean Digi Scraps
* Brad - Eyelet Outlet
* Font - DYMO
"School's Out" Card
*** MADE FOR WHAT'S SCRAPPENING? JUNE '07 GUEST DT ***
* Cardstock - Bazzill
* Patterned Paper - Heidi Grace; Daisy D's; ProvoCraft
* Flowers - Archiver's; Simply Clean Digi Scraps
* Font - DYMO
"Celebrate" Card
* Cardstock - Paperbilities
* Patterned Paper - Imaginisce "Let's Pretend"
* Green Holo Vellum - Miss Elizabeth's
* Flowers - Darice; Imaginisce
* Confetti Streamer Embellies - Dress-it-Up Buttons
* Balloons Charm - American Traditional Designs
* Brad - Making Memories
* Zots Large & Small Dots
* Karen Foster Scraparatus (for hole punching)
* "DYMO" font from DaFont.com (for Label)
"Flip-Flop" Card Template (c) 2007 - Shaunna Farral
"Basic Envelope" Template (c) 1999-2006 Mirkwood Designs, a division of ruthannzaroff.com


. Get yours at bighugelabs.com/flickr")


